Using ChatGPT in Google Sheets

A quick easy guide on how to write an App Script function in Google Sheet to call OpenAI’s ChatGPT to return the classification or main reason behind the comments in users’ reviews.

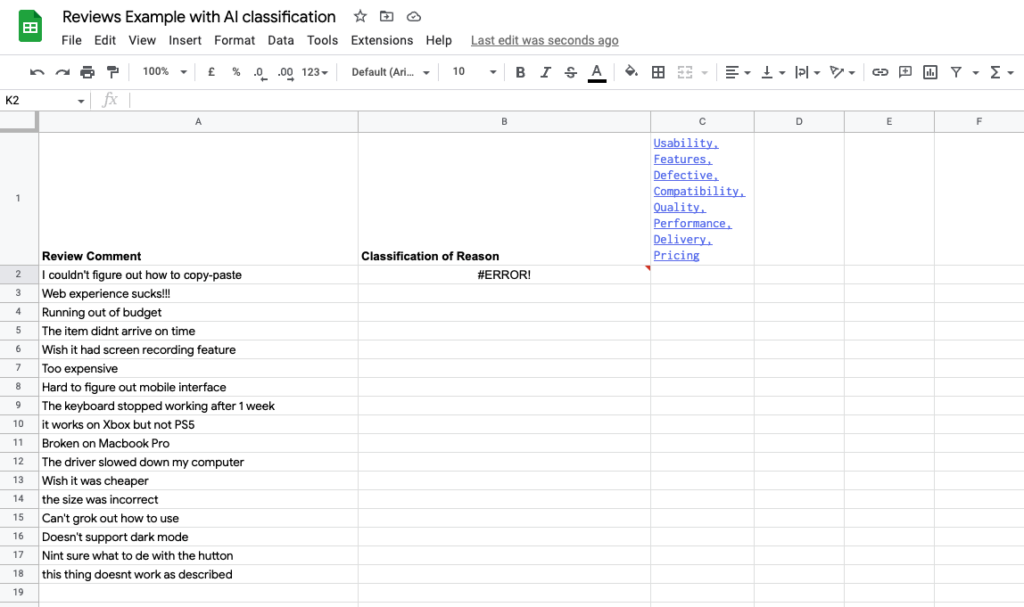
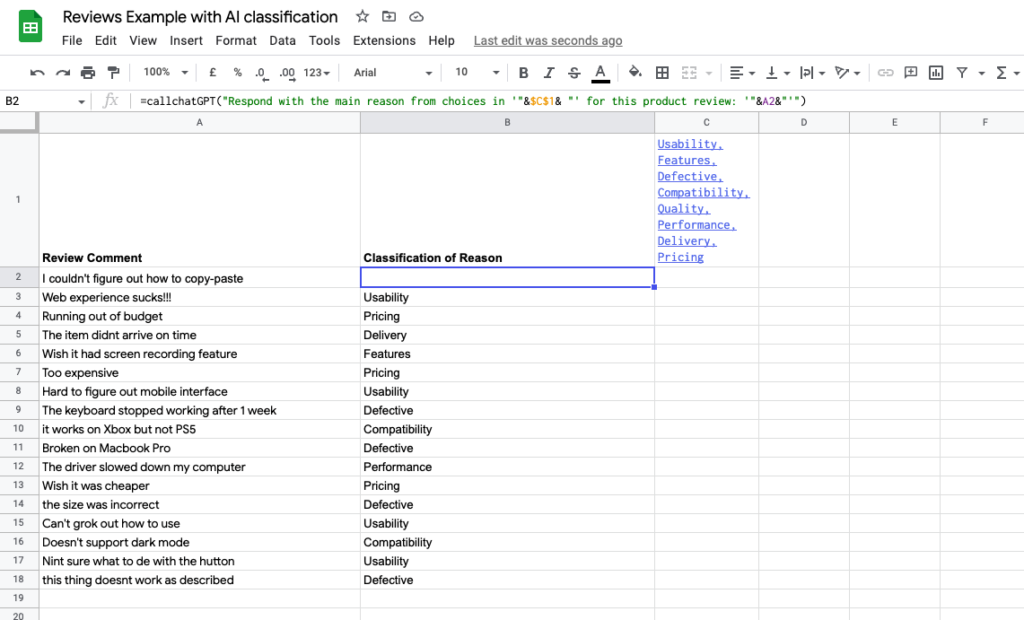
Create a sheet in Google Sheet (as above) with Review Comments in Column A. Cell C1 is a comma separated list of the classification you want ChatGPT to respond with when it reads through all the comments in Column A. Column B hold the cells that call the App Script function ‘callchatGPT’. The formula is as follows:

=callchatGPT("Respond with the main reason from choices in '"&$C$1& "' for this product review: '"&A2&"'")

From the Extensions menu, create an App Script, give it a name, and paste in the function below:

function callChatGPT(input) {
  var response = UrlFetchApp.fetch("https://api.openai.com/v1/completions", {
    "method": "post",
    "headers": {
      "Content-Type": "application/json",
      "Authorization": "Bearer YOUR-SCERET-KEY"
    },
    "payload": JSON.stringify({
      "prompt": input,
      "model": "text-davinci-003",
      "max_tokens": 250,
      "temperature": 0.4
    })
  });
  var json = response.getContentText();
  var data = JSON.parse(json);
  return data.choices[0].text;
}

In Open AI, get a Secret Key from here – https://beta.openai.com/account/api-keys. Copy key to clipboard and insert it into the code after the Bearer as above.

Save the script, and return to your sheet. Wait for ChatGPT to respond …

Note: if you have a free account, you will be limited to around 20 queries/calls per minute.

Watch the guide in action on YouTube here: https://www.youtube.com/watch?v=b3sy01YmRF4

HA on a £29 Lenovo Smart Clock 2 …

Found a hack to open up the device, based on @sazwl’s guide on YouTube.

  1. Unbox the device, allow it to do its updates, then connect device to Google Home app on your phone. I had to use an Android phone as my iPhone didn’t shown the Screen reader option.
  2. Check that calendar is linked with utterance ‘Hey Google, what’s my next appointment’
  3. Create a new appointment, make sure it is the next appointment with the subject as follows:
  4. Next, we need to get a keyboard on to the device. The easiest way to do this is to get the Screen reader to make an utterance and read out the URL above, copy that into the clipboard, then force a launch of the internal browser and paste the utterance URL into the browser, download the APK for the keyboard and install it. The steps are:
    • On Google Home app on your Android phone, enable the Accessibility option to enable Screen reader.
    • Go to the device, swiping until the calendar item is highlighted.
    • Make a ‘L’ gesture to invoke the Screen reader and keep swiping until the calendar item is highlighted.
    • Copy the last utterance to clipboard
  5. On device, get to Talkback Settings option and double click to get a new menu. Stop the screen reader on phone. Now we need to invoke the internal browser by doing the following:
    • Swiping until you get to Privacy Settings
    • Highlight the URL, paste from clipboard, highlight again and click Open
  6. On the F Droid page, scroll down to download the APK for the keyboard, and install it
  7. Power cycle the device.
  8. Now you have a keyboard. To get to the internal browser again to install more APKs, like a Launcher, do the following:
    • On Google Home app (on an Android phone), enable the Accessibility option to enable Screen reader.
    • On the device, make a ‘L’ gesture to invoke the Screen reader
    • Double click on Talkback Settings to get to the next menu
    • Stop the Screen reader on phone
    • Swipe down you get to Privacy Settings, double click to launch browser
    • Now you can use the keyboard to get to your favourite APK download site
  9. To install a Launcher, do step 8 and look for the launcher APK on F Droid using search ‘last launcher f droid’. Install launcher and power cycle.
  10. Also, suggest you install a ‘button remapper’ APK to map the ‘-‘ button on top of the device to Back and ‘+’ to Home.
  11. For setting up as Home Assistant, follow these steps:
  12. Install Fully Kiosk using step 8 – I found an APK on APNPure.
    • in HA, make a new lovelace item on dashboard called ‘clock’
    • if not installed, use HACS to install the ‘kiosk’ add-on
    • Install Fully Kiosk using step 8 – I found an APK on APNPure – make the start URL
      • http://homeassistant:8123/lovelace/clock?kiosk – replace ‘homeassistant’ with your setup
    • Power cycle the device, use the Launcher to launch Fully Kiosk!

Video of end result https://youtu.be/Z9oHF71npKI

project carcam …

My Raspberry Pi-based dashcam. Done!

Had lots of fun with the 3D printer and acquired new technical vocabulary which I’m pretty sure I won’t need again. As for reverse engineering the drideOS software on which my cam is based to add additional features such as GPS tracking and 4G to live stream video to my RTMP server, I don’t think Mei has ever heard such colourful vocabulary coming from my sweet mouth 🙂

pwned …

Just spent the morning ‘tidying up’ my login credentials after receiving an email from HIBP about the Cit0day breach. Have I Been Pwned is a service that alerts you when your identity (login credentials) has been found/leaked either in the open or the Deep/Dark web – see https://www.troyhunt.com/inside-the-cit0day-breach-collection/

But if, like me, you don’t use a password manager, working out which sites you have an account on and which email address you used for that account, can be a real PITA, even for cyber security professional 🙂 Fortunately, I am a Mac user, so getting that list of sites and then matching them to the 23,000+ sites in the Cit0day list was less painful – thanks to marcotini’s Applescript for looping through Safari’s password cache which you can find on GitHub – see https://github.com/marcotini/Get_Safari13_Passwords

Then it’s just a case of running your favourite RE tool like ‘grep’ to see which passwords corresponding to a matched leaked site you need to change …
https://www.troyhunt.com/inside-the-cit0day-breach-collection/

project iWine …

After a couple of months of head bashing, I’m pleased to announce that my iWine app (for iPhones and iPads only) is ready for public testing … As a reminder, what it does is to make wine buying or selection less of a hit and miss affair. It does this by letting you set preference flavours for 6 types of wines (red, white, rosé, sparkling, dessert and fortified) so that when you search for a wine at the supermarket or sat down in front of an intimidating wine list in a restaurant, it fetches back the flavours people mentioned in reviews and returns a % match to your stated preferred flavours – a higher % means it is more probable that you will like it. The app also has a tasting record which remembers when and where you tasted a wine and a cellar function to help you keep an inventory of what you have got stashed away and its value for insurance purposes … which in my household won’t be a problem since nothing gets laid down long enough 🙂

Anyway, if any of you are interested, message me with your UDID so that I can include your iPhone/iPad in the list of development team and you can get the app for free! Best way to find your UDID is to open up iTunes and click on the serial number.

silly siri …

After hours struggling with OAuth 2.0 in the new IOS 12 shortcuts app, I can now ask Siri to chat to the Mercedes API and ask how much fuel is left in the car … yeah I know … I could have just walked to the car and checked myself but where is the fun in that 🙂